Step One
Initial Design
Our project group set out to design a weatherproof camera that could take photos with a set increment, create a timelapse with them, and send the final product to the user’s personal email.
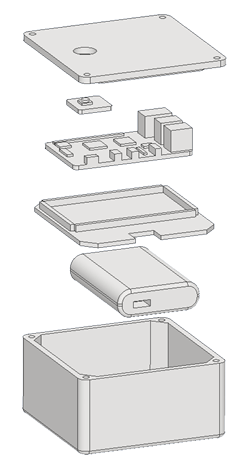
That all started with an enclosure, we decided on a PVC junction box for its slim design and removable lid. This gave us the starting point to build off of, or in this case, build inside.

Step Two
Putting the Pieces Together
Soon after taking on the project, our group had gathered the components to assemble the working camera. Now we had to secure the parts within the box to protect the more fragile computer parts from damage.
This is where CAD came in. Using Autodesk Inventor, I modeled a tray to hold the Raspberry Pi computer that would sit over the portable battery being used for power. The tray included specific tolerances to hold the computer snug and a small notch to allow the adapter for the battery to come through.
Step Three
The Code
In this project our team was challenged to create an IOT device that used a connection to the internet to perform some task. In our case, we used the internet to email the finished timelapse video to the user’s email.
There were of course challenges with this. In the class we had previously learned about the EmailMessage module and its capabilities for sending automated messages, but to attach a file to our message we would also need to use MIMEtype.
By setting the MIMEtype to ‘video/mp4’ and passing these values to the maintype and subtype we could add an attachment to our message of that type. Although this seems a little clunky, the method of splitting the MIMEtype and passing it to maintype and subtype allowed us to start out with simple pictures such as ‘image/jp2’.
Additionally you’ll find where we can alter the minutes to record, the number of seconds between each photo, and the frames per second of the final video. This gave us total control over the final product. If we desired a timelapse with more photos more densely packed together we could reduce the time between photos and increase the frames per second of the video.
import smtplib
from picamera import PiCamera
import os
from time import sleep
from email.message import EmailMessage

# Time to replace lid and set up camera
sleep(60)

# Login information for sending email
gmail_user = "example_email_address"
gmail_password = "example_password"

# Create the container email message.
msg = EmailMessage()
msg['Subject'] = 'Your Timelapse'
msg['From'] = 'example_email_address'
msg['To'] = 'destination_email_address'

tlminutes = 1 #set this to the number of minutes to record
secondsinterval = 1 #number of seconds between each photo
fps = 30 #frames per second of the timelapse video
numphotos = int((tlminutes*60)/secondsinterval)
# Declare camera and resolution
camera = PiCamera()
camera.resolution = (1024, 768)
# Clears out pictures of any past timelapse
os.system('rm /home/pi/Pictures/*.jpg')
# Start taking pictures
for i in range(numphotos):

camera.capture('/home/pi/Pictures/image{0:06d}.jpg'.format(i))
sleep(secondsinterval)

# Delete any older timelapses
if os.path.exists("/home/pi/Videos/timelapse.mp4"):
    os.remove("/home/pi/Videos/timelapse.mp4")
# Name of timelapse
fileName = "timelapse"
# Code for stitching pictures into video
os.system('ffmpeg -r {} -f image2 -s 1024x768 -nostats -loglevel 0 -pattern_type glob -i "/home/pi/Pictures/*.jpg" -vcodec libx264 -crf 25  -pix_fmt yuv420p /home/pi/Videos/{}.mp4'.format(fps, fileName))
print('Timelapse video is complete. Video saved as {}.mp4'.format(fileName))

# Allowing the program to read the file to be sent
file = '/home/pi/Videos/timelapse.mp4'
with open(file, 'rb') as fp:
    timelapse = fp.read()

# MIMEtype for the format and file type
mimetype = 'video/mp4'
maintype, subtype = mimetype.split('/', 1)
# Writing the message
msg.add_attachment(timelapse, maintype=maintype, subtype=subtype, filename=fileName)

# Sending the message
with smtplib.SMTP_SSL('smtp.gmail.com',465) as s:
    s.ehlo()
    s.login(gmail_user, gmail_password)
    s.send_message(msg)
    s.close()
Step Four
Testing
For a demonstration, our group decided to take a timelapse from the corner classroom of Griffin Hall that looks out towards the A.D. Albright Health Center. It was a little overcast but the final timelapse still came out great.
This specific timelapse took 10 minutes to create with 1 second between each photo for a total of 600 photots. Since the frames per second of the final video was set to 30 the video is 20 seconds long.
